Dear friends, I've finally moved my blog to my website! Cruise around alicemedrich.com while you are at it, and notice that my next book, Flavor Flours will be out this coming fall. You can preorder the book at Booksamillion. You can follow me on twitter @alicemedrich and on facebook as well!
Thursday, June 12, 2014
Monday, April 15, 2013
Procrastination (With Extra Virgin Olive Oil)
I do some of my best work when I supposed to be doing something else.
Right now I’m supposed to be reading/correcting
galleys for the revised edition of Bittersweet,
which will come out in October (provided that I finish reading/correcting). The new
title is Seriously Bitter Sweet. I’ve
begun to think of it (affectionately) as SERIOUS BS, but we’re not mentioning
this to anyone. My deadline is looming.
Otherwise I’m supposed to be testing recipes for yet
another new book. My deadline is looming on this as well.
I’m also supposed to be developing a fun recipe for
the back of a healthy cereal package. That deadline seems to be staring at me
too.
Why, then, am I trying out a new cookie recipe with extra
virgin olive oil? You tell
me.
HAZELNUT AND OLIVE OIL STICKS
Extra virgin olive oil and a hint of pepper make
these slender crunchy nut cookies extra good. The flavors are subtle but
sophisticated— they grow on you. You’ll find yourself eating more of them than
you expected to eat. Delicious and
interesting. Strawberries should taste good with them, or cup of oolong might
be the perfect, but I am much too busy to try either of those. I have deadlines
looming.
I shape the dough free form on a sheet of foil before
chilling and slicing, but you can use a loaf pan to control the shape if that seems
easier.
Makes about three dozen 4 to 5 -inch cookies.
Ingredients:
2/3 cup (76 grams) raw hazelnuts
1 1/4 cup (160 grams) unbleached all-purpose flour
1/2 cup plus 1 1/2 tablespoons (110 grams) sugar
3/8 teaspoon salt
¼ teaspoon freshly ground black or white pepper
6 tablespoons (80 grams) extra virgin olive oil (a lovely evoo from California would be good)
4 teaspoons cold water
Equipment:
Food processor
1 or 2 baking sheets lined with parchment
5 x 9=inch loaf pan, optional
Combine hazelnuts, flour, sugar, salt, and pepper in
a food processor, and pulse until the hazelnuts are finely chopped. Drizzle in
the olive oil. Pulse until the mixture looks like coarse crumbs. Add the water and pulse just until the
mixture resembles damp crumbs---it should not be a smooth mass—but it should
stick together when you press it. Pulse
in a bit of extra water if necessary.
If using a loaf pan, line the bottom and sides with
foil. Dump the mixture into the
pan and spread it evenly. Press it
very firmly, making a thin layer.
Or, dump the mixture onto a sheet of foil on a baking sheet and distribute
it evenly over an area about 4 to 5 inches by 9 to 10 inches. Press it firmly,
squaring up the edges, to make an even compact layer about 1/2 inch thick. Fold
the foil over the dough and wrap it tightly. Refrigerate for 2 hours or over
night.
Preheat the oven to 350F. Position racks in the upper and lower third of the oven.

Unwrap the dough and transfer it to a cutting board.
Use a long sharp knife to cut the dough crosswise, into scant 3/8 inch
slices. Use the knife to transfer
the slice and lay it onto the cookie sheet. Repeat, placing slices 1 inch apart. Slices will be fragile
and require the support of the knife in transit.
Bake
until cookies are golden brown, 15-18 minutes (time depends on thickness of
cookies). Rotate the sheets from top to bottom and front to back half way
through the baking time to ensure even baking.
Slide
the parchment carefully onto a rack or set the pans themselves on a rack to
cool. Cool cookies completely before stacking or storing. Cookies may be
stored, airtight, for several days.
Friday, March 29, 2013
Bacon Meringues
I was getting tired of seeing and hearing about bacon in every recipe all day every day. The only answer was to try it myself. These meringues really are good. You might want to cook the whole pound of bacon although the recipe calls for only 10 strips, because (who knows) you might need a snack...
One of my most esteemed tasters says "just pecans and bacon please, hold the chocolate". I see her point, the pecans and bacon are superb with nothing else, but I also like the milk chocolate in there. Have it your way. Let me know.

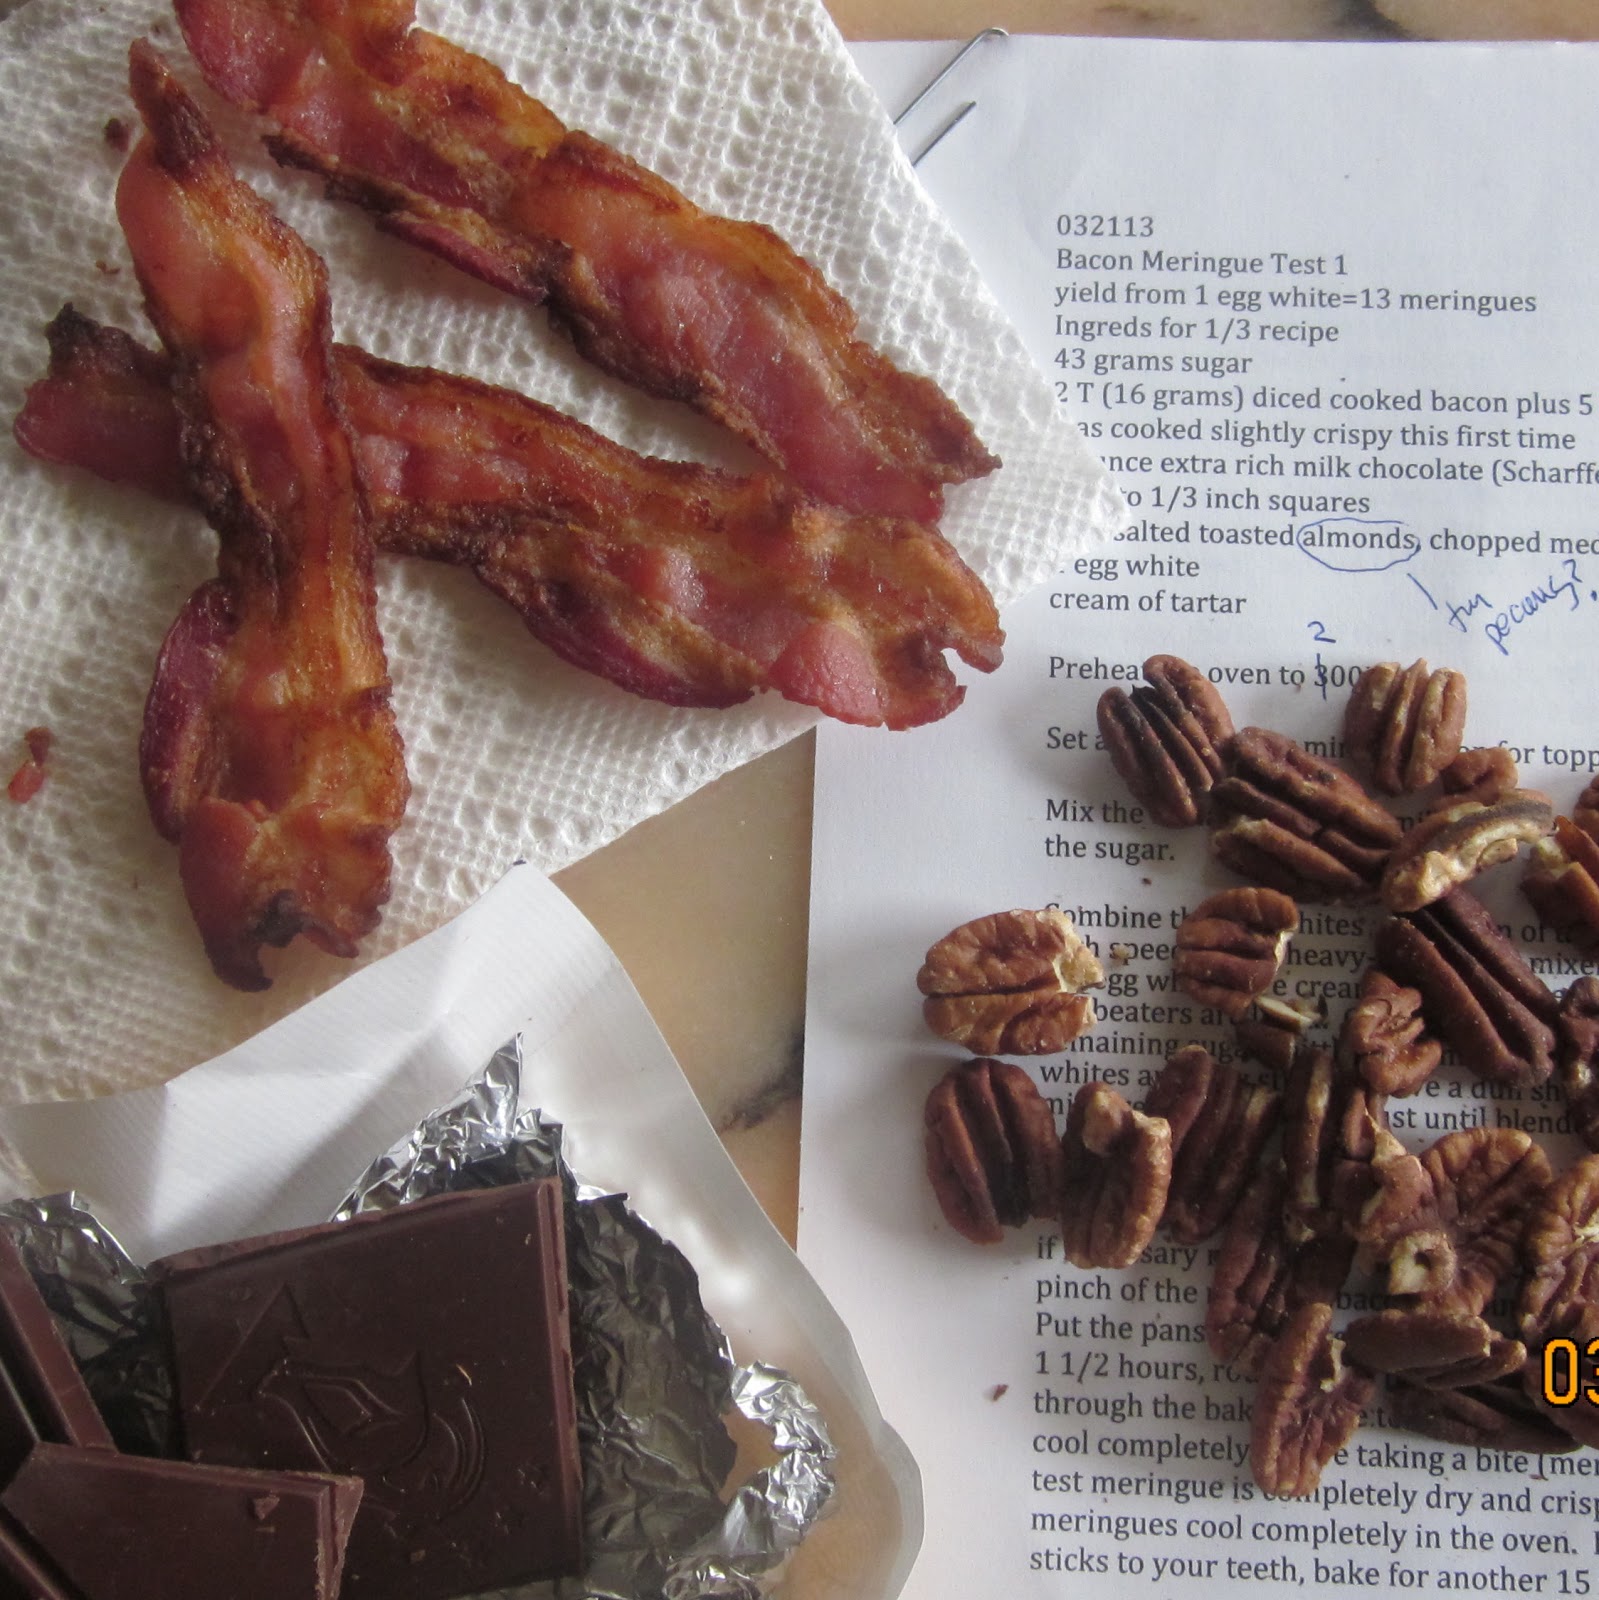
BACON PECAN MERINGUES WITH (or without) MILK CHOCOLATE
Something sweet and salty with nuts? And chocolate? How can this be wrong?
Makes 36-40 meringues
Ingredients:
Scant 2/3 cup (85 g) crumbled crispy cooked bacon*, cooled
Scant 2/3 cup (60 g) toasted pecans, chopped medium fine
3 ounces milk chocolate, cut in 1/3 inch squares (or ½ cup
milk chocolate chips) (optional)
2/3 cup (133 grams) sugar
3 large egg whites, at room temperature
1/8 teaspoon cream of tartar
*Thin cut bacon works best, you will need about 10 ounces or 10 strips, before cooking. It should be well cooked, using your favorite method. Once cool check to see if it is mostly crispy; if
not, chop to the size of crumbles and re cook briefly in a dry frying pan to render
a little more fat. Let cool.
Equipment:
Cookie
sheets lined with parchment paper
Preheat
the oven to 200 degrees. Position racks in the upper and lower thirds of the
oven
Set
aside 1/3 of the bacon for the topping.
Mix
the remaining bacon with the pecans, chocolate, and two tablespoons of the
sugar. Set aside.
Combine
the egg whites and cream of tartar in a clean dry bowl. Beat at medium-high
speed with a heavy-duty stand mixer (or high speed with a hand mixer) until the
egg whites are creamy white (instead of translucent) and hold a soft shape when
the beaters are lifted. Continue
to beat on medium to high speed, adding the remaining sugar a little at a time,
taking 1 1/2 to 2 minutes in all, until the egg whites are very stiff and have
a dull sheen. Use a large rubber spatula to fold in the bacon
mixture, just until blended.

Drop generous tablespoons of meringue 1 1/2 inches apart on
the lined cookie sheets. Make sure
all of the batter fits on the two sheets so all can be baked at once; if
necessary make each cookie a little bigger. Sprinkle each meringue with a little pinch of reserved bacon. Bake for 1 1/2 hours, rotating the pans from top to bottom
and from front to back halfway through the baking time to ensure even
baking. Remove a test meringue and
let it cool completely before taking a bite (meringues are never crisp when
hot). If the test meringue is completely dry and crisp, turn off the oven and
let the remaining meringues cool completely in the oven. If the test meringue is soft or chewy
or sticks to your teeth, bake for another 15 to 30 minutes before cooling in
the oven.
To prevent cookies from becoming moist and sticky, put them
in an airtight container as soon as they are cool. Cookies keep for a few days at least.
Wednesday, March 27, 2013
More Meringue Madness
I tasted my first Meringue Glacé decades ago in Castelnaudary,
that French town on the Canal du Midi, renowned for its Cassoulet. I was so full of Cassoulet I should not
have even glanced at the dessert menu, but I couldn’t resist the Meringue Glacé. When it came, what was it anyway? Plain-as-can-be meringues with plain vanilla
ice cream and plain whipped cream (or maybe it was crème fraîche). But it was so good
I remember it now, 40 years later. I’m
sure the Cassoulet was nice too, but I don’t recall a a thing about that part of the meal.
The simplest meringue with ice cream and whipped cream still
entices me. But I can’t always stop there: a garnish of juicy berries and warm
bittersweet chocolate sauce produces even more drama and
contrast: hot with cold, creamy with crunchy, sweet with bittersweet. If you
turn the meringue into Pavlova, you can also get chewy with gooey!
I love that meringues—simple cookies or elements of a more
complex dessert— are easy make and easy to play with. Over the years, I have
tried all kinds of inclusions, treatments, embellishments, and flavors, from
bananas to bacon (including bananas and
bacon). Some of my results are
amazing (if I do say), others not so much.
A few of the things I have added to meringues over the
decades are:
Espresso powder: very nice
Nuts, raw or toasted,
chopped and/or ground: obviously great
Roasted salted nuts
with or w/o chopped milk chocolate: terrific
Thai curry peanuts:
not as good as I had hoped
Salt and pepper
cashews: not as good as I had hoped
Cocoa power: nice enough
Cocoa nibs: good
when lots are added otherwise they
taste bitter and feel gritty
Chopped chocolate:
what’s not to love?
Candied citrus peels: dries out and become too hard to chew
Grated citrus peel: dries out and becomes too hard
Pulverized freeze dried
fruit: banana (with or without
pecans or coconut) was especially good, as was pineapple
(with or without coconut) are especially good
Dried jamiaca blossoms
(aka jamaica tea): still a work in progress
Amchur powder: interesting
Tahini: yummy
Peanut butter:
fantastic, also almond butter, cashew butter etc.
Peanut butter and
jam: good, but a little too sweet
Coconut: always
great
Bacon with toasted pecans
and milk chocolate: Delish! Recipe to come.
Organic powdered milk: extremely promising
Saffron: promising, not yet perfected
Chestnut flour: amazing
Chestnut flour: amazing
Carrot chips and/or
wasabi peas: ok, I ate them up before I made the meringues-will
try again
Many of these things ended up as recipes in books, others are yet to come. I have a long list of other things to try...including pulverized dried mushrooms.
Thursday, March 21, 2013
Chunky Chocolate Coconut Almond Meringues are Not Just for Passover
I
hate to limit anything delicious to a specific audience. I’m afraid that if I label any cookie
or dessert “for Passover” or “Gluten Free” people who don’t know from Passover
or do not suffer from gluten insensitivity will just turn the page. Meanwhile, even though I normally prefer all kinds of bitter and tart flavors, like super dark chocolate, expresso, pungent olive oil, sour pickles and so forth, I adore meringues and just can't get enough of them. Go figure.
When
you add flakes of coconut, chunks of bittersweet chocolate, salted almonds, and
nuggets of creamy coconut white chocolate to melt-in-your-mouth meringues, every bite becomes a riot of creamy with crunchy and chewy, and sweet with salty.
These cookies are crazy good (addictive really) just as they are, or you can make them into pretty individual desserts by piling on a little whipped cream and fresh
strawberries.
CHUNKY CHOCOLATE COCONUT ALMOND MERINGUES
Makes
45-50 cookies.
Ingredients:
1
cup (145) roasted salted almonds, coarsely chopped
4 ounces (115 grams) 70% chocolate (I used Scharffen Berger), cut into chunks or 2/3 cup purchased chocolate chunks or chips
3/4 cup (30 grams) unsweetened flaked coconut (coconut chips)
2 ounces (60 grams) Coconut White Chocolate (Lindt), cut into 1/3-inch squares
3
egg whites, at room temperature
1/2 cup plus 2 tablespoons (125 grams) sugar
1/8
teaspoon cream of tartar
Equipment:
2 cookie
sheets lined with parchment paper

Preheat the oven to 200 degrees. Position racks in the upper and lower thirds of the oven.
For the topping, set aside and toss together 1/4 of the almonds, 1/4 of the dark chocolate, and 1/4 of the flaked coconut.
Mix the remaining almonds, chocolate, and coconut with the coconut white
chocolate and 2 tablespoons of the sugar. Set aside.
Combine
the egg whites and cream of tartar in a clean dry bowl. Beat at medium-high
speed with a heavy-duty stand mixer (or high speed with a hand mixer) until the
egg whites are creamy white (instead of translucent) and hold a soft shape when
the beaters are lifted. Continue
to beat on medium to high speed, adding the sugar a little at a time, taking 1
1/2 to 2 minutes in all, until the egg whites are very stiff and have a dull
sheen. Use a large rubber spatula to fold in the mixture of nuts, coconut, both chocolates, and sugar, just until blended.
Drop generous tablespoons of meringue 1 1/2 inches apart on
the lined cookie sheets. Make sure
all of the batter fits on the two sheets so all can be baked at once; if
necessary make each cookie a little bigger. Sprinkle each meringue with a little pinch of reserved topping. Bake for 1 1/2 hours, rotating
the pans from top to bottom and from front to back halfway through the baking
time to ensure even baking. Remove
a test meringue and let it cool completely before taking a bite (meringues are
never crisp when hot). If the test meringue is completely dry and crisp, turn
off the oven and let the remaining meringues cool completely in the oven. If the test meringue is soft or chewy
or sticks to your teeth, bake for another 15 to 30 minutes before cooling in
the oven.

To prevent cookies from becoming moist and sticky, put them in an airtight container as soon as they are cool. Cookies keep for at least 2 weeks.
Friday, November 2, 2012
Sleepless And Going Bananas
My pal Rick Rodgers www.rickrodgers.com, author of Thanksgiving 101 and too
many other cookbooks to count, was in town just in time to escape
the devastation back home in New Jersey.
We went to Bar César for lunch yesterday and, since November is still rosé weather
in globally-warmer-than-ever Northern California, we each had a glass with our
charcuterie and cheese… and then shared a second. We walked around the neighborhood
afterwards, checking out the offerings at the Cheeseboard, the menu at Chez
Panisse, and the chocolate chip cookies made with lard at the 1-year-old Local Butcher Shop. (The cookies were interesting but we really did miss the flavor and carmelization that comes with butter). We parted around 3:00, after tasting Hungarian tortes and sipping espresso at Crixa Cakes. Such fun! But yikes!
To counter the buzz of alcohol, sugar, and caffeine (and
lard?), I decided to walk the 2 miles home.
I was in bed but still awake at 2 AM, 3 AM, and 4 AM... then
I gave up and played Words with Friends on my Iphone and exchanged silliness
with David Lebovitz www.davidlebovitz.com
on twitter for a while. I got up and cleaned out a drawer. Back in bed, I worried about the
election, wondered if the Buckwheat Walnut Crackers were baked at the right
temperature, and finally started counting good things to do with bananas—instead of sheep.
I got this far:
1. Grilled Sandwich:
filled with sliced bananas, peanut butter and honey.
2. Bananas and Cream: slice bananas into a bowl with heavy cream and garnish with a couple thin orange slices, and perhaps a drop of orange flour water.
3. Bananas and Yogurt: slice bananas into a bowl with plain yogurt, honey, and
pistachios, walnuts, or peanuts.
4. Creamy Banana Yogurt “Pudding”: mash banana with an equal
amount of plain yogurt. Sweeten and seasoned to taste with a bit of honey or brown
sugar and pinches of cinnamon or cardamom. Top with chopped walnuts or pistachios. Top with extra pinches of spice.
5. Exotic Chocolate-Dipped Popsicles: mash bananas and season to taste with cinnamon, nutmeg, and cardamom. Freeze in popsicle molds, unmold and dip in chocolate (see below), and shower with optional chopped walnuts or
sprinkles.
6. Chocolate Banana Blintzes: fold three slices of banana and a spoonful of thick ganache into each crepe, as for blintzes. Keep refrigerated until ready to sauté (very briefly) in
butter. Serve immediately. Full recipe in Chocolate Holidays (Artisan, 2001)
7. Ice Cream Sandwiches: free banana slices until hard. Process them in a food processor until thick
and creamy with a texture like soft serve ice cream. Return the mixture to the freezer to firm up. Scoop and press between thin crunchy oatmeal cookies. Serve immediately or store in a covered container in the freezer.
8. Chocolate
Dipped Bananas: impale bananas on sticks and freeze solid. Dip frozen bananas in warm chocolate dip (see recipe below), and
sprinkle with chopped peanuts, if desired.
9. Butterscotch Bananas Foster: Cut bananas in half crosswise and cut each piece in half
lengthwise. Make Butterscotch Sauce from Sinfully
Easy Delicious Desserts (Artisan, 2012), using
Bourbon or Scotch, or warm purchased sauce in a skillet. Heat the bananas in the sauce and serve
with vanilla ice cream.
10. Chocolate
Banana Waffles: Sauté banana slices in a little butter. Serve on chocolate waffles. Top with crème frâiche. Full recipe in Chocolate Holidays (Artisan, 2001)
11. Salted-Caramel Banana Bread Pudding: recipe in Sinfully Easy Delicious Desserts (Artisan, 2012)
I could have gone on, but blessedly fell asleep around 6 AM.
CHOCOLATE DIP FOR FROZEN BANANAS OR POPSICLES
Bananas are so long and curved that you would have to triple the recipe to fill a container large enough to submerge a whole banana! The solution is to make a banana shaped trough out of heavy-duty foil (as described in the recipe) so you can submerge the banana horizontally (in a custom shaped container) without needing too much extra chocolate. A little clarified butter added to the chocolate prevents a super thick coating and produces a pleasingly crisp coating that is not too hard to bite.
Ingredients:
10 ounces dark chocolate (I use Scharffen Berger 70% Bittersweet)
1/4 cup clarified butter (or ghee)
2 pinches of salt, more to taste
1 cup chopped nuts or chocolate sprinkles, optional
Put the chocolate, clarified butter, and salt in a stainless steel bowl set in a wider skillet with less than an inch of not quite simmering water. Stir frequently until the chocolate is
melted and the mixture is smooth. Taste and adjust the salt if necessary, just to brighten the
flavor of the chocolate, without making it salty. Remove the bowl and let
the chocolate cool to lukewarm. Line a tray with wax paper and set nuts or
sprinkles close at hand, if using.
For popsicles: pour the chocolate into a narrow container deep enough to dip the entire popsicle.
For bananas: Place a large piece of heavy-duty foil loosely
over a bread pan that is longer than a banana. Using the pan for support, mold the foil into a narrow
trough— slightly wider and longer than a banana and deep enough to submerge the
whole fruit, held by the stick, and lowered with the curved side down. Fill the trough with chocolate; refill the trough as necessary with the remaining chocolate.
Dip each popsicles or frozen banana into the
chocolate and sprinkle immediately with nuts or sprinkles, if using. Set dipped items on the lined
tray. Put the tray in the freezer
until the chocolate is completely hardened. Transfer treats to a container or
zipper lock bag and keep frozen until serving. Excess dip can be kept in the fridge or freezer and used again.
Tuesday, August 7, 2012
Ten Quick Smart Things To Do With Strawberries: Day Seven
I had better finish up my 10 ideas for strawberries before strawberries go out of season! Fortunately this idea is good for fresh cherries too, not to mention figs.
Serves 15 or more
Chocolate dipped strawberries(cherries, figs...) are easy and fun to make. Any child (of any age) would love to help you with dipping. Choose a brand of chocolate that
you love to nibble. (And choose a bar of chocolate rather than chocolate chips
or anything called “chocolate coating,” even if it is sold in the same aisle as
the fruit. Chocolate chips won’t melt well, and the so called chocolate coating
sold in the produce aisle is not delicious enough. No need to “temper” the
chocolate to keep it shiny: the secret to preventing the chocolate from turning
gray and streaky is to dry and chill the fruit before dipping, then refrigerate
it as soon after dipping as possible.
CHOCOLATE DIPPED STRAWBERRIES
Ingredients
About 2 pints small or
medium strawberries (with or without stems), or up to 36 large
strawberries with stems, or 1 ¼ pounds cherries with stems
8 ounces bittersweet or
semisweet chocolate, coarsely chopped, or milk or white chocolate, finely
chopped
Equipment
Cookie sheets
Fluted paper candy cups
(optional)
Rinse the fruit gently
and spread it out on a tray lined with paper towels. The fruit should be as dry
as possible before dipping; if necessary, pat it dry or use a cupped hand to
cradle each piece gently in a soft dishtowel or a paper towel. Refrigerate
until chilled.
Line the cookie sheets
with parchment paper. Put the chocolate in a small heatproof bowl,
preferably stainless steel. Bring an inch of water to a simmer in a wide
skillet. If using semisweet or bittersweet chocolate, set the bowl directly in
the skillet and keep the water at a bare simmer. If using milk or white
chocolate, turn the heat off under the skillet and wait for 60 seconds before
putting the bowl in the hot water.
Stir dark chocolate frequently,
milk and white chocolate almost constantly, until almost entirely melted, then
remove the bowl, wipe the bottom dry, and stir to finish melting the chocolate.
The chocolate should be warm and fluid, but not hot. Grasp fruit by the stem or
the shoulders and dip it about two-thirds of the way into the chocolate, or
deeper if you like. Lift the fruit above the chocolate and shake off the
excess, letting it drip back into the bowl, then very gently wipe a little
excess chocolate from one side of the fruit on the edge of the bowl, set it on
a lined cookie sheet, wiped side down, and slide it forward slightly to prevent
a puddle of chocolate from forming at the tip. Refrigerate each tray as soon as
it’s filled, and keep refrigerated until ready to serve. Serve
any time after the chocolate has set enough that you can peel the fruit cleanly
from the parchment. Transfer each one to a fluted candy cup, if desired.
If you are making chocolate dipped cherries, be
sure to warn you guests that the cherries all have pits!
For more
ideas for strawberries, see recent posts and my new book, Sinfully Easy
Delicious Desserts (Artisan 2012) by Alice Medrich
Subscribe to:
Posts (Atom)


